Archer Aero CS launched

January 8, 2010

The latest model from Archer Watches is the Archer Aero CS.  This limited edition of 20 pieces builds on the very successful Aero line, adding many new features.

Case – the 42 mm diameter case is made of 316 stainless steel and features sapphire crystals front and back. The front crystal has an anti-reflective coating inside and out, and the back crystal also has this coating on the outside. The case has a brushed finish, and features a large Flieger crown for easy winding and setting (other crowns available upon request).

Movement – based on the ETA 6497 hand winding movement, this example has many additional features. First is the central seconds complication, complete with stop function at 12 o’clock. When the crown is pulled to the setting position, the central second hand will travel to 12 and stop to allow for accurate synchronization to a known time source.

The movement also features blued screws, Côtes de Genève, and rhodium plating.  Additional perlage finishing has been done to both sides of the movement as well. The crown wheel and ratchet wheel have snailing decoration added. The screwed balance is made of glucydur, and the hairspring has been upgraded to Niravox 1 quality. A Swan’s neck regulator has been added for fine adjustment of the watch’s rate.

Dial/Hands – the dial and hands feature strong Super-LumiNovA for easy reading in dark conditions.

Strap – The Aero CS is available on a brown or black 22 mm Jürgen’s pilot strap, or on an optional brushed stainless steel bracelet.

For more information on this model, please email me at archer.watches(at)sympatico.ca

http://www.archerwatches.ca/

Cheers, Al


Servicing a Doxa dive watch

October 16, 2009

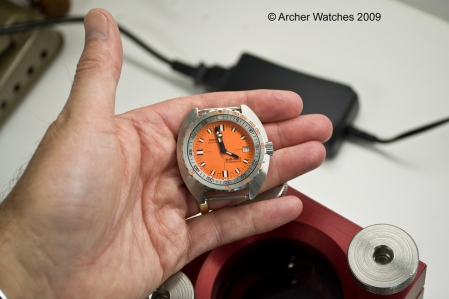
I recently received this Doxa Sub 600T with the complaint that the watch would not run for very long. 

Doxa 600T_0013 copy

The owner had also complained that the bracelet end link didn’t fit tight to the case on one side, and when I removed the bracelet I found out why.  The spring bar just fell apart on my bench, so very fortunate this didn’t happen while the watch was being worn:
Doxa 600T_0015 copy

Opening the case, the ETA 2824-2 is seen:

Doxa 600T_0016 copy

Here the hands and dial have been removed:

Doxa 600T_0022 copy

Now I start removing the calendar:

Doxa 600T_0026 copy

Here the winding/setting mechanism has been removed:

Doxa 600T_0027 copy

Now to the top plate, and the ratchet wheel has been removed.  I wanted to point this out as here there is a boss that is part of the barrel bridge that the ratchet wheel rides on.  You can see the black material where the green arrows are, and this is material that has worn off the boss at the spot indicated by the red arrow.  This movement can wear a great deal here so one reason why regular service is a good idea, even if the watch appears to run well:

Doxa 600T_0029 copy

Carrying on with disassembly:
Doxa 600T_0031 copy

Here the base plate has been stripped of all parts:

Doxa 600T_0034 copy

And everything is apart now and placed by function in the storage trays: 

Doxa 600T_0037 copy

But they don’t stay there long as up next is the cleaning machine:

Doxa 600T_0039 copy

Doxa 600T_0040 copy
Here I am applying the braking grease to the mainspring barrel:
Doxa 600T_0045 copy
Here the new mainspring has been installed in the barrel:
Doxa 600T_0047 copy

And the barrel is back together as a unit and set aside ready for the movement at a later time.  The next thing I do is lubricate and install the balance jewels, and install the balance to check the hairspring.  Here you can see the spring as it goes through the regulating pins, and it’s too far to the right and touching the inner pin, where it should be centered between the pins:

Doxa 600T_0052 copy

Here the spring has been adjusted, with attention being paid to the overall centering/spacing of coils from above.  This required rotating the hairspring stud and also manually manipulating the spring:

Doxa 600T_0053 copy

Now the balance is removed and the assembly can begin, so here the barrel and barrel bridge is in place:

Doxa 600T_0054 copy

More reassembly:

Doxa 600T_0057 copy

Doxa 600T_0058 copy
Doxa 600T_0059 copy
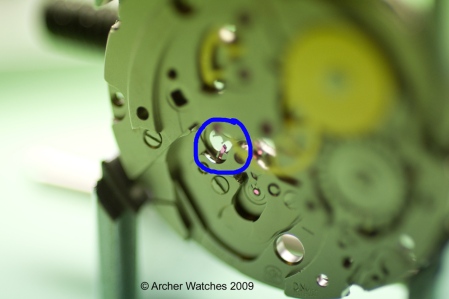
Now we are at the point where the escapement needs to be lubricated, and the pallet stone I will oil is shown in the small blue circle:
Doxa 600T_0060 copyAfter that is complete, I place the balance cock and the balance fires right up:

Doxa 600T_0061 copy

I then check and oil the reversing wheels, and assemble the bridge

 
Doxa 600T_0066 copy

So now to assemble the calendar:

Doxa 600T_0069 copy

Now it’s time to put this back together, so the dial and dial spacer are first:

Doxa 600T_0088 copy

Then the hands are pressed on, paying attention to the date change so that it’s within the tolerances:

Doxa 600T_0090 copy

Now the watch is cased:

Doxa 600T_0094 copy

And I install the auto-winding bridge:

Doxa 600T_0096 copy

And onto the timing machine for initial regulation:

Doxa 600T_0097 copy

Once that’s done, time to close it up and do some extended timing and power reserve tests:

Doxa 600T_0099 copy
Doxa 600T_0103 copy
Ben Debaufre_0024 copy

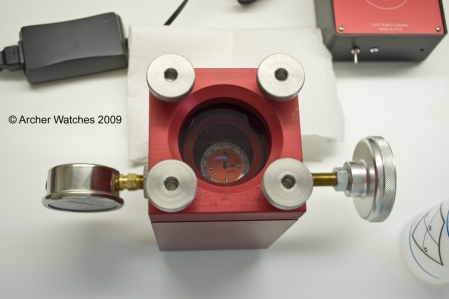
The next step is checking the water resistance of this watch.  For this I use 2 machines.  The first is the Witschi Proofmaster S dry pressure testing machine.  This machine is set to the dive watch program, which first subjects the watch to a -0.7 Bar vacuum, and then a +10 Bar pressure.  The watch is constantly measured to detect deflection in the case, and through those measurements determines if the watch is water resistant.  Here the watch is ready to be mounted in the chamber:

Doxa 600T_0104 copy

And here the test is complete, and I have magnified the results screen and inset it into the photo:

Doxa 600T_0106 copy copy

But we aren’t done yet.  This watch is rated to 600 m or 60 Bar, so a test at 10 Bar won’t really tell us if it’s performing as it should.  For that we use a wet testing machine.  There is some risk with this second test, as the process basically involves trying to force water into the case at high pressure:
Doxa 600T_0108 copy

The watch is placed in the holder, and then into the test chamber.  The test chamber is filled with distilled water to the very top:

Doxa 600T_0109 copy

The lid is placed trying not to allow any bubbles inside the chamber:

Doxa 600T_0110 copy

The watch is tested at a higher level than it’s rated capacity, so for a 60 Bar watch, the machine is set to 70 Bar, or just over 1,000 pounds per square inch:
Doxa 600T_0111 copy

The watch is left at this pressure for 2 hours, then I come back and lower the pressure, and remove the watch:

Doxa 600T_0115 copy

The watch is dried off and placed on a heating station that heats the watch to 47 degrees C:

Doxa 600T_0116 copy

30 minutes later, I return and place a few drops of room temperature water on the watch crystal:

Doxa 600T_0117 copy

I wait a couple of minutes and then wipe the water off.  If the watch has leaked the inside of the crystal will have fogged, but this one is clean:

Doxa 600T_0119 copy

The bracelet was mounted and the watch returned to the client.

I hope you enjoyed seeing how a modern dive watch is serviced.  If you have any questions or would like to have your watch serviced, please contact me at archer.watches(at)sympatico.ca

http://www.archerwatches.ca/

Cheers, Al

Restorations

July 14, 2009
Here are some before and after photos of a few watches I’ve restored.

The first example is a Youngs Jewellers model from the 1970’s.  Youngs is a chain located in Canada that sold watches under their own name at one time.  This one had the crystal replaced, the case replated, and the A. Schild 1713 automatic movement serviced.

Youngs watch before

Youngs watch before

Youngs watch after

Youngs watch after

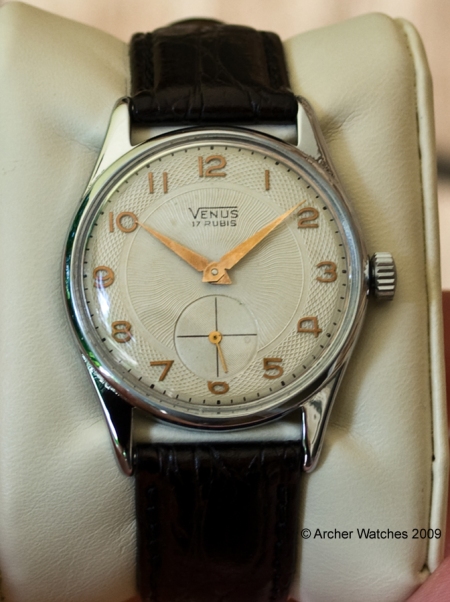
The next example is a vintage Venus manual wind watch.  This watch had the Fontainemelon movement serviced, the crystal replaced, the dial was cleaned, and the case was chrome plated as it was in terrible condition as received.
Venus watch before

Venus watch before

Venus watch after

Venus watch after

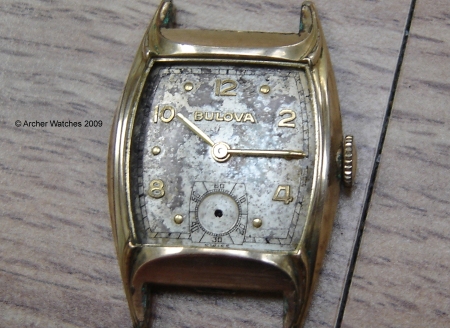
Next up is a vintage Bulova from the 1950’s.  Many times there is a debate regarding the need or desire for having the dial of the watch refinished.  My approach to redials and case polishing/plating is to be conservative, and only perform these things if the watch is in very bad condition, or if the client specifically asks for this service.  In this case the need to have the dial done was quite evident.  For this job the case was plated, the missing crystal was sourced and installed, the missing second hand was sourced, the dial was stripped and reprinted, and the movement was serviced.  The result is quite dramatic.
Bulova watch before

Bulova watch before

Bulova watch after

Bulova watch after

This is another vintage Bulova, but this time the case was in good shape so rather than replate it, all that was required was a light polish to bring back the shine and colour.  The movement was serviced and the crystal was replaced.
Before - left                     After - right

Before - left After - right

This watch is a WWII era military watch made by Vertex.  Vertex was one of twelve makers who produced these watches under contract with the British military.  On this case the dial was in good shape, but the luminous material on the hands at the number markers was no longer glowing and the customer wanted that material to be functional.  So instead of having the watch redialed, the dial/hands were sent to have the luminous material redone.  A tint was added to the new luminous material in order to give it an aged look rather than using the bright white that is typical.  The movement was serviced and the watch looks very good after the work was done.
Vertex watch before

Vertex watch before

Vertex watch after

Vertex watch after

I hope you enjoyed this look at some watches that have been restored.  If you have any questions I can be reached at archer.watches(at)sympatico.ca
Cheers, Al


Servicing a Panerai 113

April 10, 2009

I was recently contacted by a client about the repair of a Panerai 113.  I agreed to do the work and thought I would share the repair process here.

Here is the watch…
113-19

The customer said that the watch would not wind, so the first thing that came to mind was that the set lever screw had come loose, which is common and simple to fix.  However when I received the watch and tried some things it was clearly a different problem – the watch would wind but generated no power.  I had a good idea what was wrong.

113-21
After removing the strap, I open the case back:

113-33

In order to remove the movement, the stem has to come out, so the crown lock has to come off:

113-43

Here is the movement out of the case:

113-53
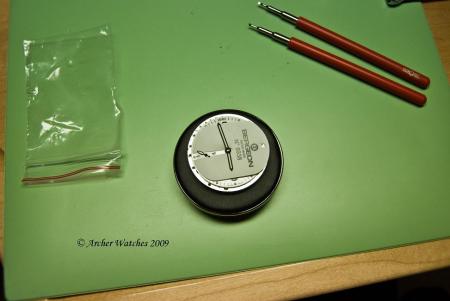
Next the hands come off, and I use a protective shield to make sure the hand levers do not damage the dial:
113-65

The hands are removed:

113-76

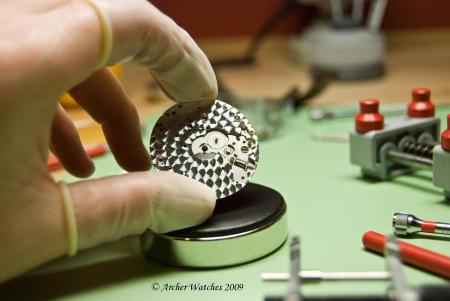
Next the dial is removed – nice perlage on the bottom plate:

113-84
Here I have removed the winding/setting mechanism:
113-92
Next I went straight to the barrel bridge, removing it to get the barrel out as this is where I think the problem really is:

113-102

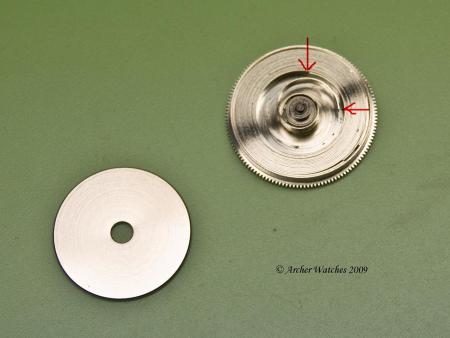
When I opened the barrel, there is the problem – broken mainspring.  I’ve added some arrows where you can see the two ends of the broken spring:
113-111

Here is the spring out of the barrel, and you can see the inner coil that attaches to the arbor is broken:

113-121

Since the watch has been used for 4 years every day, time for a full service anyway, so I’m carrying on with the disassembly:

113-132

Now everything’s apart and segregated by function in the storage trays:

113-141
So I will order a new mainspring for the watch, but while I wait for that I might as well continue with the cleaning.  Here the parts are placed in mesh baskets for the ultrasonic cleaner:

113-151
The two baskets go through 4 different jars of solutions – here the parts are in the second jar:

113-162
Here is a shot of a jar with the parts in my ultrasonic machine:

113-171

So I’ve finished cleaning everything now, and the wait for the new mainspring begins.

113-271

For an ETA 6497-2 you purchase an entire barrel complete which is the spring already installed in a new barrel – here it is:

113-281
I begin by removing the new barrel from the packaging and inspecting it:

113-301
It looks fine but before I install it I want to check the barrel arbor end shake to make sure its okay – I hold the barrel steady and use my brass tweezers to move the arbor up and down to check the end shake – its good:

113-381

I always like to start reassembly by checking the centering and flatness of the hairspring, and in order to do this the balance jewels need to be lubricated and installed – I start with the bottom plate jewel and add some Mobius 9010 to the cap jewel:

113-311
Then I install it on the main plate – here it’s in place and the shock spring just needs to be closed:

113-322

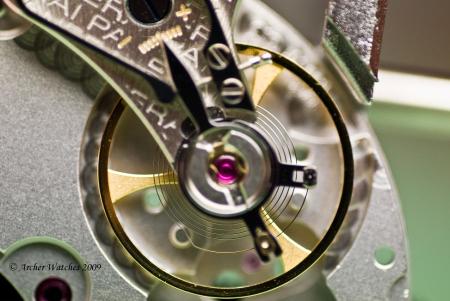
I Install the balance in the watch and then lubricate/install the balance jewels on this side, then I can look at the centering of the hairspring – it’s pretty good but did require a small tweak:
113-341

Once the spring is centered looking from above, I look to see if it’s centered between the regulating pins – after another small adjustment it looks good:

113-351
Now the last step is to close the regulating pins – not tight enough that they pinch the spring just a small clearance on each side:

113-361
Then I remove the balance assembly and set it aside.  Next I install the train wheels so I can check their end shakes – they were all good so no need to move any jewels:

113-371

So now I can carry on with the assembly – here the barrel is installed and the barrel bridge is in place:

113-391

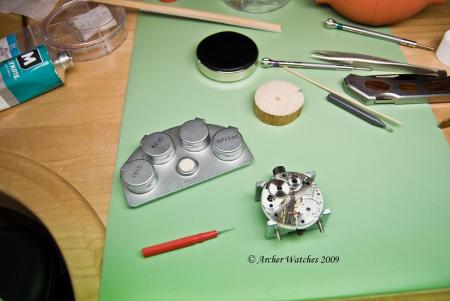
Next step is lubricating all the train wheels – in total 7 different lubricants are used in this watch:
113-401

Then I install the pallet fork and pallet bridge:

panerai-043

The next step is lubricating the escapement.  This is a critical step and can be tricky on smaller calibers especially – on larger movements like this one it’s not so bad.  The photo below shows the exit pallet stone (red arrow) and this is where I apply the Mobius 9415 – a special oil used just for this one application.  It takes several applications of small amounts of oil and then running the escape wheel around to get the proper amount in place:

panerai-045

Next I install the balance again and get the watch running.  I put it on the timing machine and make the initial adjustments:

113-411

The watch is checked in 5 positions at full wind and 5 positions at full wind minus 24 hours.  Once it looks close I proceed to installation of the dial/hands.  Here the hour wheel and dial washer are both in place, the dial is ready to be installed:

113-521

Now with the dial on I check the hands:

113-541

With all the hands installed, I check to make sure all the hands clear each other:

113-591

The case is cleaned out and the movement placed in it, then the stem is lubricated:

113-601

Next the movement clamps are installed:

113-611

Now the case back gasket can be lubricated before installation:

113-641

Now the watch is mostly assembled. 

113-661

I did some timing checks to make sure the watch ran well – I do this by winding the watch and putting it in a specific position (dial up, dial down, crown down, crown left, and crown up) and compare the gain or loss 24 hours later against a known standard….time.gov.

The watch ran fine so I moved on to the final assembly and testing steps.  I have to install the crown lock system first…

113-671

Now that is installed and we are ready to pressure test the watch.

113-691

The pressure testing with this type of tester involves suspending the watch in a chamber above the water line, and then raising the pressure inside the chamber.  Here the watch is inside and I have raised the pressure to 10 atmospheres.

113-711

After a couple of minutes I lower the watch into the water, and slowly release the pressure from the chamber.  If the watch case has a leak, the pressure inside the case would have equalized with the pressure in the chamber when the watch was out of the water.  Now as I lower the pressure inside the chamber, the pressure is the watch would be higher, and air would escape and show a stream of bubbles.

113-721

Some bubbles may appear but as long as they are single bubbles and not a stream coming from a point, there is no leak.  No streams of bubbles on this one so it’s good!

113-751
Now time to mount the strap.

113-771
All done and ready to be shipped out to the customer.

113-781

I hope you enjoyed this look at how a repair is done.

Cheers, Al

archer.watches(at)sympatico.ca

http://www.archerwatches.ca/

More of my watches

February 27, 2009

This model is the Archer Executive – blue hands version….

blue-executive1-sm

And this is the Reference 1440…

ref1440hdr-cataloguesm

ref-1440-cataloguesm

Both of these watches feature the very nice (heat blued) Breguet style hands.

Cheers, Al

archer.watches(at)sympatico.ca

http://www.archerwatches.ca/

The Archer Aero video

January 30, 2009

With each Archer watch that I sell, I include a document showing the build of that customer’s watch.  I have always received very positive feedback on this idea from my customers, so I thought a video version showing the process would be fun for people to see.

This video shows the building and testing of an Archer Aero pilot watch.

Enjoy!

Cheers, Al

archer.watches(at)sympatico.ca

http://www.archerwatches.ca/

Introducing the Archer Aero II

January 17, 2009

New for 2009 a variation on the Archer Aero (the most popular Archer model to date).  The Archer Aero II features a new case design and finish.  The new case has more rounded lugs, a chamfered bezel, and a bead blasted finish for a more rugged appearance.

The Aero II case is 42mm in diameter not including the crown, uses spring bars and accepts a 22mm strap.  The case features sapphire crystals both front and back, and the front crystal has a double anti-reflective coating.  The movement is an ETA 6497 with the hours and minutes on the main dial, and the seconds on the sub-dial located at 9 o’clock.  The movement features côtes de Genève decoration, rhodium plating, and blued screws.

archer-aero-bbsm

archer-aero-bb-backsm1

The original Aero model is still available.

For information on this or other Archer Watch models, please contact me at archer.watches(at)sympatico.ca

http://www.archerwatches.ca/

Cheers, Al

Some archery photos

December 28, 2008

As promised here are some photos of my shooting/competing days…

cubasilver1

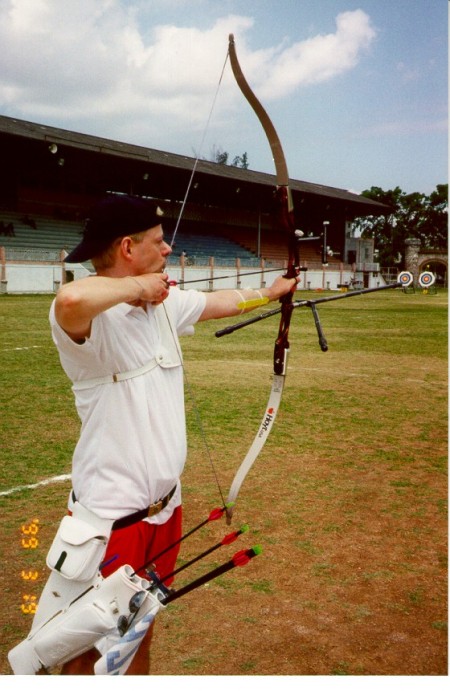
This first photo is in Havana, Cuba where my team mates and I won the silver medal in the men’s Olympic competition.  We lost a close one to Argentina in the gold medal match, after defeating some other teams in the early rounds (including the #1 ranked US team).  I am on the right of our group as noted with the blue arrow.

This is me shooting in that team event…

shot2

Next an event in Venezuela in 2001….our team in the opening ceremonies.

ven-3

I’m at the back in this one….

Me shooting…with a team mate to my left.

ven-1

And the three of us shooting in the team round at this event – we won the bronze here in a strong field of countries.

teamround

I am on the right waiting my turn to shoot, while another team member is shooting, and the other is spotting the arrows – we shoot at 70 metres in this event so it’s hard to see where your arrows are hitting the target. 

This next one is me shooting at the Canadian Championships in the gold medla match.  It was the end of July, but only 7 degrees C out and it was COLD!  I think I had 7 layers on my upper body, from tee shirts to sweaters to thermal shirts….and a biking shirt on top (one layer was a garbage bag to keep the rain out).  I won this event so despite the weather it was a good day.  🙂

gold2

And here I am at the athlete entrance to the US Olympic Training Center in Chula Vista, CA when I was there for a week of training.

otc006a

And this is me shooting there.

otc030a

It was a great week of training, but unfortunately it was shortly after this that my shoulder started giving me a lot of problems, and this lead to shoulder surgery in 2004.  The surgery helped but in the end it wasn’t enough to allow me to continue competing at this level.

Anyway, I hope you enjoyed the photos!

http://www.archerwatches.ca/

Cheers, Al

Some of my watches

December 9, 2008

Today I wanted to show a couple of the watches that I have been making.  The first is called the Archer Aero.  This is a watch styled after the WW2 German pilot watches, and is my most popular model to date. 

It is housed in a 42mm stainless steel case, with sapphire crystals front and back.  The front crystal has anti-reflective coatings on the inside and outside of the crystal.  The watch houses an ETA 6497 movement.  The watch is wound using the large flieger crown.  Here is a photo of one on a black Jurgens pilot strap.

blackaero-catalogue

Here is a shot of the lume on this watch – it glows very brightly in the dark!

aero-lume1

All watches are tested for water resistance to 7.5 ATM…

summer-2008-713-catalogue

The second watch is called the Archer Executive – this is the “Silver Edition” with silver spade hands set on an enamel lacquer dial complete with Roman numerals.  This watch uses the ETA 6498 movement.  Again the case is 42 mm so this is an ideal dress watch for those who prefer larger watches.

executivesilver-catalogue

For more information on this or any model, please email me at:

archer.watches(at)sympatico.ca

http://www.archerwatches.ca/

Cheers, Al

Some History

December 7, 2008

The name “Archer Watches” comes from the sport that I have loved for over 30 years – archery.  I’ve had 2 archery “careers” in my life, the first starting at the age of 12 when I stumbled upon a demonstration by the local archery club.  It was love at first sight, and that lead to 8 years of shooting and competing, mainly in the junior ranks.  I was successful locally and provincially, and in 1981 won my first national championship.  I won 2 (indoor and outdoor) in 1982.

I gave the sport up as I moved on from high school and continued my education, but the second archery career was to come.  It all started as I watched the 1996 Olympic Games in Atlanta, and although I didn’t see any archery on TV (not exactly a TV friendly sport) I began to wonder…”was I good enough?”  I was presented with a choice – don’t take up the sport again and always wonder, or give it a shot and work at it even though there was a risk of not making it.  I decided I needed to try – not knowing was just not an option.

I started in earnest in 1997 when the coach of the Canada’s Olympic team at the Atlanta Games agreed to be my personal coach.  She worked with me a lot and I had some struggles early on, but then things started to take off.  By 1999 I was able to win the men’s Canadian Target Archery Championship.  Over the next few years I did a lot of travelling and shooting, and had some wonderful experiences competing internationally.  I never did make the Olympic team, but I would not trade the experiences I had for anything.

I had to give the Olympic style shooting up recently since I have a type of arthritis that makes the training schedule required to shoot an the level I once did quite impossible to keep.  My focus has shifted to watches and this is another all-consuming passion in my life.

I will post some photos of my archery days in the next while, so stay tuned!

http://www.archerwatches.ca/

Cheers, Al